

You will need the following materials:
1 - 5/8 in. x 3-1/2 in. x 6 ft Cedar Dog Ear Fence Picket - $1.28 at Lowe's - (Link Here)
hand or power saw
gloves
eye protection
Finishing nails
wood glue
sand paper
floral dry foam
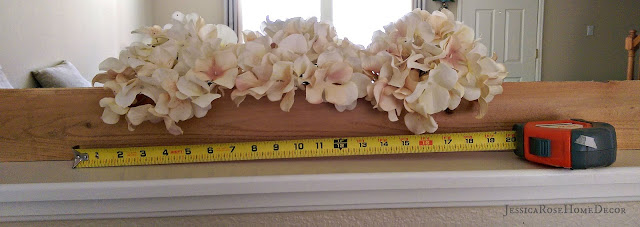
Prop up your wood plank and place whatever you plan on placing in your flower trough up against it, like shown. This will give you an idea of what the dimensions of your box should be. I also measured the width of my bar to determine an ideal width for the box. Once you have determined your dimensions, cut your pieces and nail them together. I made sure knots were visible to add the the weathered look we are going for.
hand or power saw
gloves
eye protection
Finishing nails
wood glue
sand paper
floral dry foam
Prop up your wood plank and place whatever you plan on placing in your flower trough up against it, like shown. This will give you an idea of what the dimensions of your box should be. I also measured the width of my bar to determine an ideal width for the box. Once you have determined your dimensions, cut your pieces and nail them together. I made sure knots were visible to add the the weathered look we are going for.

For this portion of the tutorial, I will guide you through my weathered/distressing painting process. For a more in-depth
explanation with pictures, I will link my **Distressing: How-to Make Anything Look Antique** blog here. I highly suggest using a sponge brush for this portion. I find that it
helps to soak up any excess paint to ensure a light application.
Feel free to skip this part if you have a paint of your own in mind :)
I used the following paints - all purchased from Michael's:


Feel free to skip this part if you have a paint of your own in mind :)
I used the following paints - all purchased from Michael's:


First, apply 2 coats of the white paint letting it dry in-between each coat.

On top of the white paint, lightly dab your brush into Oyster Beige. Swipe random strokes of this color onto each side. Take a paper towel and wipe off the excess. Let that dry. Then lightly dab your brush into Parchment and again swipe random strokes of this color onto each side of the box. Again, wipe off the excess & let that dry as well.
As you can see, the subtle layering of different color paints has now given the wood dimension (as oppose to just using one color, which makes it look flat). And, as you sand, there will be even more dimension added - The wood will peak through the white paint, which will peak through Oyster Beige, which will peak through Parchment. This painting and sanding technique is the best way to truly make something look weathered.
Insert your floral dry foam, place your flowers atop, and you are DONE! Easy-peasy!


On top of the white paint, lightly dab your brush into Oyster Beige. Swipe random strokes of this color onto each side. Take a paper towel and wipe off the excess. Let that dry. Then lightly dab your brush into Parchment and again swipe random strokes of this color onto each side of the box. Again, wipe off the excess & let that dry as well.
As you can see, the subtle layering of different color paints has now given the wood dimension (as oppose to just using one color, which makes it look flat). And, as you sand, there will be even more dimension added - The wood will peak through the white paint, which will peak through Oyster Beige, which will peak through Parchment. This painting and sanding technique is the best way to truly make something look weathered.
 |
| Without sanding |
 |
| With sanding |

 |
| Front |

 |
| Back |
 |
| Left Side |
I love the warmth & comfort it brings to both my living room and
kitchen. The toned-down nature of this piece goes to show you that less
truly is more :) Crazy to think that in a few weeks I will probably be switching out these hydrangeas for Autumnal decor...WHAT?! But that's another aspect of this piece that I love - it is so customizable!! I don't have to just stick with flowers - I could put jars, candles, fillers, add knobs...the possibilities are endless :)


No comments:
Post a Comment