Search This Blog

Sunday, September 27, 2015

3 Ways: Distressed Autumn Mason Jars


It's no surprise that I have an obsession with distressed mason jars. Here's my super easy & affordable take on how to paint & style them for the Fall season :) I find that each one brings a different light & tone into the space it occupies. The beiges & browns add a coziness & home-y feeling while the more golden & cream tones brighten up the room. So if you're indecisive as to which one you should do, ask yourself what the room/space needs. No matter what you choose - beiges, cream, & browns go along with so many different colors that you won't have to worry about whether or not it will match the color scheme in your home.

Before you start painting your mason jars, first remember to clean them with soap and water. Wipe them down to dry and then apply rubbing alcohol on the outside of each jar with a cotton ball. This will ensure that all dirt and oils have been wiped away so that the paint will adhere to the glass surface. To distress, I used 150 fine grit sandpaper for each tutorial listed below.

#1: Halloween Mason Jar
Paint used:
Wheat used - Hobby Lobby $3.00 each:
 
Apply 2 coats of orange paint to a clean mason jar. I mixed equal parts Terra Cotta & Orange Spice.

When that has dried, apply 1 coat of Burnt Umber and let dry. Distress with sandpaper. As you sand, you will begin to see the orange color peak through Burnt Umber! Add some twine & wheat and you are done :)

I placed mine on my kitchen counter, next to my basket of lotions :)


#2: Beige & Brown Mason Jar

Wheat used - Hobby Lobby $3.00:

After painting & distressing, add twine & the brown wheat, and you are done! I placed this arrangement in my bedroom. The brown tones make the bedroom feel so comfy & home-y :)

If you are curious about the Pottery Barn-inspired glass window, I have also done a tutorial on it as well. They were made using pictures frames from the Dollar Store! LINK HERE >> http://jessicarosehomedecor.blogspot.com/2015/07/how-to-diy-rustic-window-dollar-store-picture-frames.html


#3 Cream & Golden Mason Jar
Paint used:

Wheat used:


Apply 1 coat of White paint. Ley dry. Then apply 2 coats of Parchment. Using White as the base coat brightens up Parchment. When that has also dried, distress with sandpaper, add twine & wheat, and you are done!

I decided to place this on my kitchen bar :) The golden & cream tones really brighten up my living room!
 Add an heirloom pumpkin for a pop of color ;)

And there you have it - 3 different ways to paint & style mason jars for the Fall season!

Friday, September 25, 2015

DIY Mini-Pumpkin Patch


Going into this Fall season, I knew I wanted to incorporate hay stacks into my seasonal decor, specifically these cute miniature size ones I found at Michael's! Since hay is synonymous with pumpkin patches, I found it fitting to 'stage' a DIY mini-pumpkin patch for my staircase shelf in my living room! This was styled more towards the neutral spectrum of color with pops of autumnal color (you know how much I love my neutrals!!), but there are so many ways you can customize this to make it your own -you can add more color, or other objects synonymous with the Fall season.  

You will need the following materials: Grand Total: 10.52!!
Metal bucket - I painted mine white (Michael's - $2.99 Full Price; $1.79 with coupon)
Hay Stacks (Michael's - $4.49 Full Price; $2.25 with coupon)
Mini-Pumpkin & Pine Cones (Hobby Lobby - $6.99 Full Price; $4.19 with discount)
Mini-Wood Crate (Michael's - $1.00 Full Price; $0.50 with coupon)
Harvest Corn (Hobby Lobby - $2.99 Full Price; $1.79 with discount)

Paint Sponge

3 paint colors of your choice I used these:

What you want to do first is turn your bucket on its side and arrange your setup to cascade out of the bucket. Stage your pumpkin patch before you paint any of the pieces. This allows you to plan out what colors you want to paint each pumpkin. Since I'm using 3 different paint colors - I made sure I didn't put the same colors near each other to ensure that the overall look would not fall flat & bland to the eye. Use 2 coats and let dry. Shown below was my initial set-up:


I felt like it was missing that little something extra, specifically color & dimension! To fix this, I added a crate to give the setup depth and height. I also added the corn for a pop of color and fullness. Simply painted the crate white and twisted off the corn from each stem.
Add acorns & pine cones, place on your shelf, & you are done!!!


Sunday, September 20, 2015

Classic Fall Wreath Tutorial


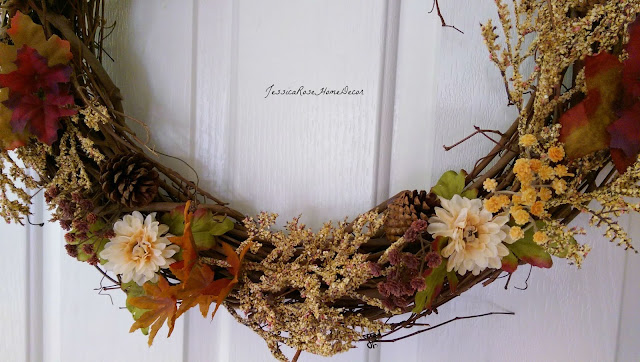
Sometimes those artificial Fall flowers you see in stores can be too over-saturated with color. Bright oranges, yellows, and reds can come off a little cheap & tacky looking. To avoid this, I incorporated creams and beiges with subtle hints of earth-toned reds, yellows, and browns into my entryway wreath this year. I love how it turned out! It's humble rather than overstated - making a statement without screaming loudly with color ;) And it cost me no more than $10!!

You will need the following materials:
Wire Cutters
 Grapevine Wreath
High Temp Glue Gun
Twine
Flowers
Small Pine Cones

What inspired this was this branch piece I found at Hobby Lobby. It was something I had never seen before & I loved how soft and earthy it looked.
Cut & apply as shown:
 These flowers from Michael's go along perfectly with the branch piece we just used! I love that the beige color is concentrated on the inside and fades out to an autumnal cream color.
Michaels: $1.29 for 3 flowers in one set - purchased 2 sets
 Apply in-between the branch pieces, as shown:

For reference, I cut each piece at about this length:


 Now for pops of color. I love the brown/brick/terra cotta color of this flower stem. Plus, the tiny flowers are so adorable! It adds color and texture without overshadowing the other parts of the wreath
Hobby Lobby: $3.99 Full Price, $1.99 Sale Price
Apply as shown:


I wanted to incorporate red & yellow into the mix as well.
Dollar Store: $1.00
Hobby Lobby: $3.99 Full Price, $1.99 Sale Price
 Place, as shown:


 Add some small pine cones throughout, secure with your glue gun, and you are done!

Close-ups:


Wednesday, September 16, 2015

DIY Rustic Autumn Wreath UNDER $10!

For today's DIY, I wanted to create something not seen very often in homes or craft stores. My goal was to encompass all your classic, autumnal characteristics, but with a twist - a vertical twist. This tutorial goes beyond your typical circular wreath for this time of year and it is SO simple! My inspiration was this grapevine wreath I found at Hobby Lobby - I'd never seen anything like it! It adds such a perfect rustic-feel to any room :)

You will need the following materials:
Assorted mini pumpkins, acorns, and pine cones - leftover craft materials
Ornament Wire - $0.99 (Wal*Mart)
Wire Cutters
Hot glue gun
Grapevine wreath, shown above - $3.99 full price, $2.39 with coupon (Hobby Lobby)

Maple Leaf Bouquet - $5.99 full price, $2.99 sale price (Michaels)

Wheat Bouquet - $4.99 full price, $2.49 sale price (Michaels)
The materials I found at Michaels were 50% off & I also applied a '25% off your entire purchase' coupon, thus making this project ridiculously inexpensive!

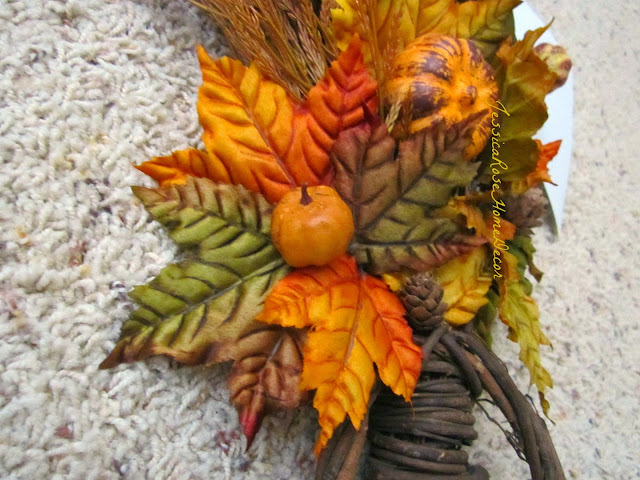
Taking your wire cutters, cut your maple leaves leaving a 1/2 inch stem. Secure them to the front-bottom section with ornament wire. Securing the wire should look like this:
Be sure to leave the back portion of the wreath empty. I did 2 diamond-shaped patterns on the left and right sides & filled in the middle as I saw fit, but you can do as you wish. 
Left Side
Right Side
When the leaf placement is to your liking, go ahead and add mini-pine cones, pumpkins, and acorns using your glue gun.
Next, secure the wheat pieces along the top back of the wreath with ornament wire. Be sure to intermix various hues of brown & beige and stagger them a little. Doing this will add length, foliage, & dimension - it is the most crucial step. Not doing so will leave it falling flat to the eye. 
Back View
Up-Close
Add twine to the back to act as a mount and you are finished!
Hang on a wall in any room for the perfect touch of rustic-bliss;)

If you re-create this DIY, please leave a photo in the comment section below - I'd love to see them!